The ![]() Floor
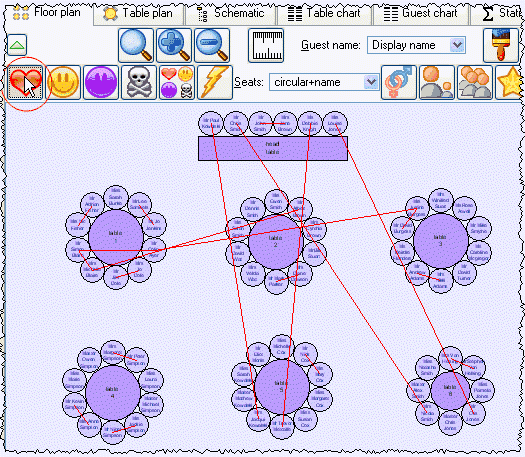
Plan pane shows an
'aerial' view of your table plan. You can only select one seat or
table at a time in this pane.
Floor
Plan pane shows an
'aerial' view of your table plan. You can only select one seat or
table at a time in this pane.
Clicking on the ![]() and
and ![]() buttons zooms in and out. Clicking on the
buttons zooms in and out. Clicking on the ![]() button zooms and scrolls (pans) the display to show all the tables in
your plan. When you are zoomed in you can move around by clicking on
the scroll bars or by dragging the background (the cursor will change
to a hand).
button zooms and scrolls (pans) the display to show all the tables in
your plan. When you are zoomed in you can move around by clicking on
the scroll bars or by dragging the background (the cursor will change
to a hand).
By default the inside of the floor plan is shown in white and the
outside of the floor plan is shown in grey. You can change the floor
plan dimension by clicking on the ![]() button. The Dimensions window
will be displayed.
button. The Dimensions window
will be displayed.
Change the Guest name
drop-down to change the way in which the names of assigned guests are
displayed. Click the ![]() button to change the fonts and colours.
button to change the fonts and colours.
Hint If you want to hide table names in the floor plan just set the colour of the table font to the same as the colour of the table.
Select from the Seats drop-down list according to how you want guests and seats to be displayed.
New tables are inserted in a vacant space near the current centre of the pane. Once a table has been placed you can drag it to any location inside the floor plan.
You can rotate a selected table clockwise by selecting Edit|![]() Rotate table or the equivalent Main
tool bar button. Tables are rotated in steps of 45 degrees
each time. For finer control set the Angle
field in the Table properties window.
Rotate table or the equivalent Main
tool bar button. Tables are rotated in steps of 45 degrees
each time. For finer control set the Angle
field in the Table properties window.
Guests can be dragged between seats or from the ![]() Guests pane
or
Guests pane
or ![]() Groups pane.
Drag a guest away from a seat or table to unassign them.
Groups pane.
Drag a guest away from a seat or table to unassign them.
Note If you drag a guest on to a seat where another guest is already assigned the guests will swap seats with the guest being dragged.
Right click or ![]() Ctrl+Click
on a table or seat to display actions in a pop-up menu.
Ctrl+Click
on a table or seat to display actions in a pop-up menu.

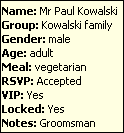
When you hover the mouse cursor over a table or assigned seat a tool tip window with summary information will appear. You can turn these tool tips on/off in the Preferences window.
Click on the ![]() button to open up the filter and show additional buttons.
button to open up the filter and show additional buttons.
Hold down the ![]() button to show all guests that should be sitting next to each other.
button to show all guests that should be sitting next to each other.

Hold down the ![]() button to show all guests that should be sitting near to each other.
button to show all guests that should be sitting near to each other.
Hold down the ![]() button to show all guests that should not be sitting next to each other.
button to show all guests that should not be sitting next to each other.
Hold down the ![]() button to show all guests that should be not be sitting near to each other.
button to show all guests that should be not be sitting near to each other.
Hold down the ![]() button to show all guest proximities.
button to show all guest proximities.
Hint It is easier to
see proximities if the ![]() button is not depressed.
button is not depressed.
Hold down the ![]() button to show all non-optimal seating arrangements, e.g. guests that
should be sitting next to each other that aren't.
button to show all non-optimal seating arrangements, e.g. guests that
should be sitting next to each other that aren't.
Depress the ![]() button to show the gender of guests (blue for male, pink for female).
button to show the gender of guests (blue for male, pink for female).
Depress the ![]() button to show the age of guests (large for adult, small for child).
button to show the age of guests (large for adult, small for child).
Depress the ![]() button to show which groups guests belong to. The seats are colour
coded for up to 100 groups (and then repeat the colour sequence). The
colours are chosen automatically - you can't change them. The colours
should be distinguishable even for people with most types of colour blindness.
button to show which groups guests belong to. The seats are colour
coded for up to 100 groups (and then repeat the colour sequence). The
colours are chosen automatically - you can't change them. The colours
should be distinguishable even for people with most types of colour blindness.
Depress the ![]() button to show VIP guests and VIP tables.
button to show VIP guests and VIP tables.
Depress the ![]() button to show guests with special needs.
button to show guests with special needs.
Depress the ![]() button to show locked guests.
button to show locked guests.
Hint Some of the above will be easier to see if you use simple (e.g. default ) colours in the Floor plan pane.
When you are happy with the layout you can print this page with File|![]() Print.
You can also export the image as a PNG,
BMP,JPEG or SVG file using File|
Print.
You can also export the image as a PNG,
BMP,JPEG or SVG file using File|![]() Export|
Export|![]() Floor plan or copy
it to the clipboard using Edit|
Floor plan or copy
it to the clipboard using Edit|![]() Copy.
Copy.
Next: Table plan pane >>