The Import data window
allows you to import data into your plan from other applications, for
example from
an Excel spreadsheet. This can save you a lot of typing. To
display this window select File|![]() Import|Guest data.
Import|Guest data.
Enter the location of the file you wish to import in Location. Click on the Browse... button to navigate to the file.
Use Ignore first if you wish to ignore some of the records in the file, for example a header record.
Use the Format drop-down list to choose whether the imported file is in Excel CSV format or a custom format (e.g. fields separated by TAB characters). If you are using a custom format, set Field separator and Record separator to the field and record separators in the import file.
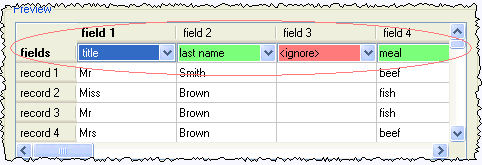
Preview shows you how the file data will be imported, including the effects of changes to the Ignore first etc.
Note If your spreadsheet contains non-ASCII characters (e.g. Chinese or other Unicode characters) these may be lost when you save your Excel .xls file to a .csv file. To avoid this problem save as Unicode text (*.txt) and import using Custom format a TAB delimiter.
You need to tell PerfectTablePlan which columns (fields) in the spreadsheet correspond to which guest properties. Select from the drop-down lists at the top of each column to do this. For example the field 1 column might correspond to the guest title, the field 2 column to the guest last name and the field 4 column to the guest meal choice. Leave the drop-down list as <ignore> to ignore the contents of a column.
Text is imported directly from the Preview cells, except for Gender, Age and RSVP, which are based on the values below:
|
Column |
Values |
|
Gender |
Text must start with:
otherwise the guest is imported with unknown gender |
|
Age |
Text must start with:
otherwise the guest is imported as an adult |
|
RSVP |
Text must start with:
otherwise the RSVP is unset. |
If title is imported, but not gender, the import will attempt to guess the gender from the title.
If two or more guests have the same value in the group column they will be added to the same group. If no group is set then consecutive guests with the same surname will be added to the same group. You can choose the proximity to use for members of the same group from the Proximity for guests in the same group drop-down list.
You can easily edit any of these properties at a later point.
Note You can edit information in the Preview table. This will change the information imported, but not affect the contents of the file you are importing.
Click on Add record to add an additional row to be input. This is useful if you want to type in the data for additional guests.
Click on Delete record to delete the currently selected row.
Click on Add field to add an additional column to be input. This is useful if you want to type in some additional data for each guest, e.g. their gender or group.
Click on Delete field to delete the currently selected column.
Click Apply to import the data. Click OK to import the data and close the window. Click Cancel to discard the changes.
See also:
Importing guests from text and Excel CSV files
Import guest details from an Excel spreadsheet
Import guest details from Outlook
Import guest details from Outlook Express
Next: Information window >>